


Turn Google Home Mini into Home Assistant Speaker Using a Drop-In PCB
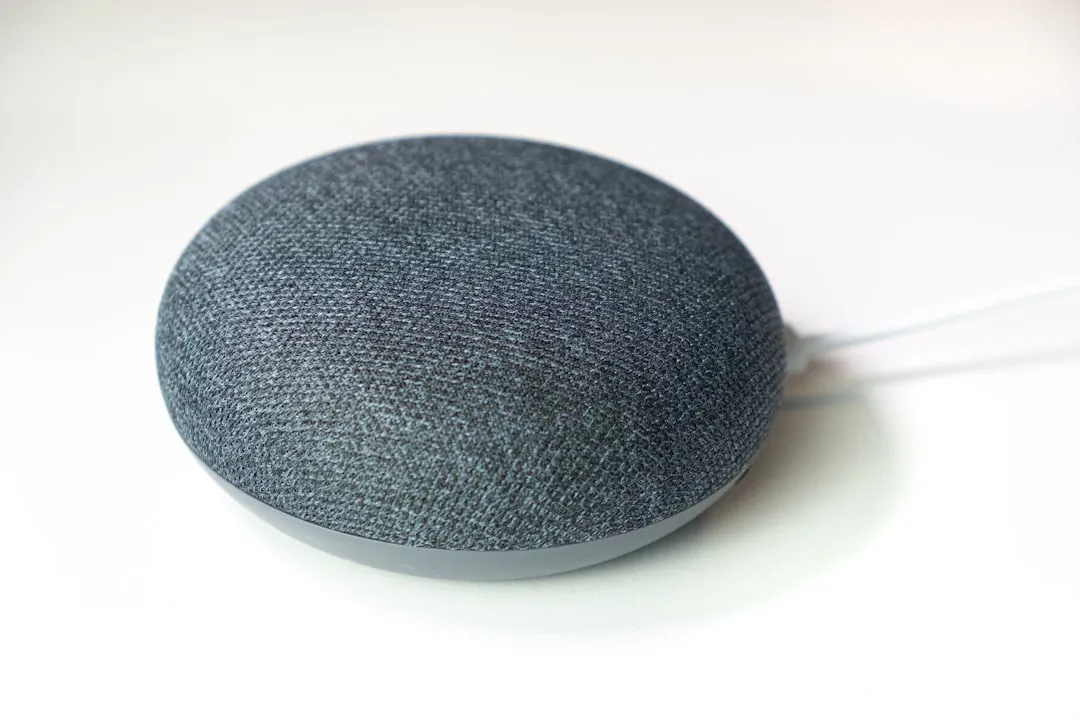
The MiciMike Home Mini project is a drop-in PCB replacement for the original Google Home Mini v1, the flat fabric puck with the Micro-USB port. Swap the board, flash the firmware, and you can turn Google Home Mini into a Home Assistant speaker that stores command logs on your own server, with no data routed through Google's voice-assistant cloud services according to Matter Alpha's review of the identical firmware stack. The replacement board uses the same ESP32-S3 and XMOS XU316 chips as Home Assistant's official Voice Preview Edition and runs the same ESPHome firmware.
That's the upside. The honest picture is more conditional.
Wake-word detection from across the room ran at roughly 50% success in Joe Karlsson's testing last June. Response latency for local processing starts around 4 seconds for simple commands on capable hardware and climbs from there. The chip architecture is well-matched for the job. The broader ecosystem is still earning its "Preview" label.
This guide covers who should attempt the conversion, what the PCB and assembly situation actually looks like, how to provision the converted speaker in Home Assistant, and what to expect from the result. One caveat stated up front: the performance data below comes from reviewers using the official Home Assistant Voice Preview Edition, which uses same core ESP32-S3/XMOS architecture and ESPHome-based firmware stack. How the MiciMike board performs acoustically inside Google's specific enclosure has not been independently validated at time of writing.
Turn Google Home Mini into Home Assistant speaker: who this mod is for
Before ordering boards, figure out whether this project is actually for you. It's a narrow target audience, and that's fine.
You're a reasonable candidate if:
You already run Home Assistant on capable hardware, a mini PC or equivalent. Local Whisper speech-to-text inference is painful on a Raspberry Pi. Running on a Ryzen 5 system, ceard.tech measured roughly 4 seconds of latency for a simple lights command early last year still about twice what Google Home takes, and that's on good hardware. A Pi will be noticeably worse.
You're comfortable ordering a custom PCB from a fabrication service like JLCPCB or PCBWay, sourcing components from a bill of materials, and assembling surface-mount boards. Or you know someone who can handle that part.
You value local data control over assistant polish. Home Assistant's Assist handles smart-home control, timers, and shopping lists reliably. It does not answer general knowledge questions out of the box, and weather queries and Spotify playback require additional configuration that's the defined scope of the project right now, not an oversight, as XDA Developers covered last July.
You have a first-gen Google Home Mini v1 sitting unused. The Nest Mini v2 is a parallel project in a separate repository at a different maturity stage. This guide covers only the v1.
Skip this and buy the ready-made option if:
You want something that works reliably from day one. The official Home Assistant Voice Preview Edition costs around $60, per Matter Alpha's review last October, and runs the same firmware on known-good hardware though it carries the same ecosystem limitations and its own share of bugs. More on that in the conclusion.
You don't already run Home Assistant. This project adds a voice satellite to an existing smart-home server. It is not a standalone product.
Cost and effort: PCB fabrication with assembly from services like JLCPCB typically runs $20–50 for a small batch, based on common fab pricing for boards of this complexity, but verify exact BOM costs directly from the GitHub repository before ordering that figure is an estimate, not a researched quote. Add disassembly time, firmware flashing, Home Assistant setup, and a realistic troubleshooting budget of several hours. Not a one-evening project.
What the PCB is, what the mod involves, and what's still unknown before you order
The confirmed hardware
The replacement board is a 4-layer PCB carrying an ESP32-S3R8 with 16MB flash for Wi-Fi, Bluetooth LE, and onboard wake-word detection. Paired with it is an XMOS XU316 DSP chip with 4MB flash that handles noise suppression, acoustic echo cancellation, interference cancellation, and automatic gain control, all running locally on the device. The board also includes dual MEMS microphones at 68mm spacing, an AIC3204 DAC and TPA6211 amplifier driving the original speaker, dual I²S buses for simultaneous audio input and output, and four SK6812 RGB LEDs. It's a complete smart-speaker platform built to reuse Google's enclosure rather than replace it.
As of last July, the project had completed schematic design, component placement, routing, EMI shielding, and a first test batch run, per the project repository. The files are structured for direct submission to a fab service and carry a "ready for manufacturing" status the project author's own assessment, with no independent build validation available at time of research.
What the physical mod actually involves
The conversion means removing Google's original PCB from the v1 enclosure and installing the MiciMike replacement board in its place. The board is designed as a drop-in: same form factor, reusing the original speaker driver and enclosure. What the repository does not yet document are the specifics of that disassembly connector types, clip locations, and whether any steps are destructive. Check the issue tracker and any community build logs before committing. A purchase-ready BOM with LCSC part numbers was also not confirmed in available documentation at time of research; the repository references SnapEDA and LCSC for footprint sourcing, but a verified ready-to-order parts list may require manual cross-referencing. Whether any vendor offers a prebuilt kit is similarly unconfirmed.
These aren't reasons to abandon the project. They're things to resolve before spending money on fabrication.
Before closing the enclosure: The Google Home Mini runs on low-voltage DC from an external adapter. Verify the replacement board's power connections are secure and nothing is bridged before powering on. If anything looks unclear, check the GitHub issues first.
How firmware stays current
The board is designed for hardware compatibility with the official Home Assistant Voice PE ESPHome configuration, meaning upstream firmware improvements can flow to this board without separate maintenance work on the MiciMike side. The project explicitly does not develop new firmware features that work happens upstream. Firmware lives at github.com/esphome/home-assistant-voice-pe on the ESP32 side and github.com/esphome/voice-kit-xmos-firmware on the XMOS DSP side. Pin assignments may differ for this specific enclosure; check the project repository for any device-specific overrides before flashing the stock config.
On speaker quality
The official Voice Preview Edition's built-in speaker is adequate for voice responses but noticeably weaker than a Google Home Mini for music. Ceard.tech called it underwhelming in their write-up from early last year. The MiciMike board drives the original Google Mini's speaker using the hardware that enclosure was actually designed for, which may perform better acoustically but this is untested on this specific board-in-enclosure combination. Treat music playback as something to evaluate after setup, not a primary use case to plan around.
How to provision the converted speaker in Home Assistant
This section assumes the PCB is assembled and you're ready to bring it online.
Before starting, confirm you have:
Home Assistant running on hardware capable of local Whisper inference. Ryzen-class mini PC or better. Not a Pi for local STT.
ESPHome installed as a Home Assistant add-on.
The device connected to power and on your local network.
1. Flash the XMOS audio firmware first. Pull the XMOS firmware from github.com/esphome/voice-kit-xmos-firmware and flash it to the XU316 chip before touching the ESP32 side. This DSP layer handles microphone cleanup. Without it, voice recognition input will be degraded regardless of how capable your speech-to-text engine is.
2. Flash the ESPHome firmware to the ESP32-S3. Use the Home Assistant Voice PE config from github.com/esphome/home-assistant-voice-pe. Check the project's GitHub for any device-specific pin overrides before flashing the stock configuration.
3. Power on and add the device to Home Assistant. The device should appear as a discoverable ESPHome node under Settings > Devices & Services. Select it, enter Wi-Fi credentials when prompted, and press the button on the device when the wizard asks. Setup on comparable hardware took only a few minutes and went exactly as documented, according to both Joe Karlsson and ceard.tech.
4. Select a wake word. The three options are "Okay Nabu," "Hey Jarvis," and "Hey Mycroft." None of them feel natural after years of "Hey Google." They're not static, though wake-word models are continuously improved by the community, and training a custom word is supported if none of the defaults work for your household, per XDA Developers.
5. Assign the device to a room before testing anything. Home Assistant scopes device-control commands to the room the satellite is assigned to. "Turn off the lights" in the bedroom targets bedroom lights, not every light in the house. Matter Alpha noted this is one of the more useful behaviors once properly configured.
6. Configure your STT pipeline. For fully offline operation, install the Whisper add-on and select it as your speech-to-text engine. Expect 4–10 second response times on local hardware. A Nabu Casa Home Assistant Cloud subscription offloads STT to the cloud and drops latency substantially but that reintroduces a cloud dependency into a project you're building specifically to avoid one. Ceard.tech addressed this tension directly. Decide that tradeoff deliberately.
7. Test with simple device-control commands first. "Turn off the kitchen lights." "Set a 10-minute timer." These are the commands Assist handles most reliably. Lights, brightness, color, cover control, media players, vacuum cleaners, and shopping list additions are all supported natively, per XDA Developers.
8. Add weather and music via community blueprints if needed. Assist doesn't handle weather questions or Spotify requests by default. Both can be added through community blueprints using the Whisper add-on; find them at the Home Assistant community forum. Music Assistant with the Spotify Connect plugin adds voice-controlled music playback that works similarly to casting on a Google device, according to XDA Developers.
On command syntax: Unlike Alexa, Assist does not attempt conversational inference. Deviate from expected command structure and it won't respond not with an error, just silence. Matter Alpha flagged this as one of the more friction-causing aspects of daily use. Keep a short reference list of working command formats nearby during the first week.
Is this worth doing now?
Attempt the conversion if you have a working Home Assistant setup, a v1 Google Home Mini sitting unused, PCB assembly in your skill set, and a genuine preference for local control over convenience. The chip architecture matches Home Assistant's own reference hardware, and upstream firmware improvements can flow to this board without requiring separate maintenance. The remaining unknowns are practical assembly experience, BOM sourcing, enclosure disassembly specifics not architectural.
Wait or buy the ready-made option if you're not already running Home Assistant, you want something reliable from day one, or the assembly logistics feel like a barrier. The official Voice Preview Edition runs identical firmware, but go in clear-eyed: one reviewer's units stopped responding entirely after about a month, showing only a generic error state, as Matter Alpha reported last October. The "Preview" label is honest in ways that are occasionally inconvenient.
Before spending money: Check the project's GitHub issue tracker for recent build reports and confirm whether a purchase-ready BOM has been added since this writing. Then keep the ESPHome add-on updated as you go. The Open Home Foundation's stated goal is fully offline, private voice control in any language without mandatory cloud dependency, as XDA Developers quoted from the project. This build is a working step in that direction not the finished destination, but a functional one for the right person.
For next steps: the Music Assistant setup guide for Home Assistant, the Whisper add-on configuration walkthrough, and the ESPHome device provisioning documentation are all worth bookmarking before you start.


Comments
Be the first, drop a comment!